How do you perform this exercise?
Set up
- Hang from a bar, hands shoulder width apart, overhand grip.
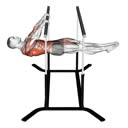
- Pull your shoulder blades down and raise your body to horizontal, in tuck, straddle or full position.
- Squeeze your glutes and brace hard so your hips stay level with your shoulders.
Row
- Bend your elbows and pull your chest toward the bar, elbows close to your body.
- Keep your body flat as it rises: hips and shoulders move up together.
- Bring the bar to your lower chest or upper stomach and squeeze your shoulder blades.
Lowering
- Straighten your arms slowly back to the front lever, without letting your hips drop.
Breathing and finishing the set
- Breathe in at the bottom, hold your brace as you pull and breathe out as you lower.
- End the set when your body no longer stays flat, then lower your legs and come down from the bar.
Common mistakes
Hips dropping as you pull
Why: Your arms take over and your core lets go, so you row in a tilted position.
Fix: Use an easier position, tuck or one leg out, where your body stays flat on every rep.
Pulling the bar to your neck
Why: You lead with your head to get the chin over the bar, which shortens the row and lifts the hips.
Fix: Aim the bar at the bottom of your chest and keep your head in line with your body.
Losing the lever between reps
Why: At the bottom you relax into a hang, then swing back up for the next rep.
Fix: Stop each lowering in the lever, arms straight, and start the next pull from there.
Tips
- Set the lever first by pushing the bar toward your hips with straight arms, then bend your elbows to row without letting your hips drop.
- Use a tuck position with knees to chest until you can raise and lower with a flat back under control.
- Lower slowly from the top over three to five seconds; controlled negatives build lever strength fast.
- Stop the set when your hips start to pike or your back rounds; sloppy reps do not transfer to the hold.
How many sets and reps?
| Goal | Sets | Reps | Rest |
|---|---|---|---|
| Learning (tuck rows)Knees tucked to the chest, back flat, full range. | 3–4 | 4–6 | 2 min |
| StrengthAdvanced tuck, straddle or one leg out, as long as your body stays level. | 4–5 | 3–5 | 2–3 min |
| Upper back volumeUse an easier position than in your strength sets. | 3 | 6–10 | 2 min |
How do you track it in STARK?
LoadingBody weight
One side at a time
Previous: 4 × 0 lbsResume
Previous: 4 × 0 lbsResume
Previous: 3 × 0 lbsResume
Previous: 3 × 0 lbsResume
+ Add a set- Leave the weight at 0, or enter the weight of a vest or belt if you add one.
- Add each position, tuck, straddle or full, as your own exercise so each one keeps its own history.
- Each set shows your previous reps: add a rep in the same position before moving to a harder one.
- STARK keeps the load until you reach your target reps on every set, then tells you it is time to make it harder.
- Start the rest timer from the set, also on Apple Watch, where you can log the set between two hangs.
Frequently asked questions
What muscles does the front lever row work?
Main muscle: upper back. Secondary muscles: lats, biceps and core.
What is the difference between a front lever row and a front lever hold?
In the hold, your arms stay straight and you keep the body horizontal. In the row you keep that same flat body position and bend your elbows to pull your chest up to the bar, which adds a pulling range on top of the lever strength. It is usually trained in a tuck or straddle position first.
Should you do front lever reps or holds?
Both are useful. Holds build strength in the exact position, while reps and negatives add volume through the full range. Many programs combine short holds with a few controlled raises.
STARK · Updated October 26, 2026. Demonstration: ExerciseDB. Description, steps, mistakes, sets and reps, tips and questions written by STARK. Related movements are options to compare, not equivalent loads or a prescribed progression.